Showing posts with label Baked Goods. Show all posts

Thursday, July 19, 2018

Cookie Bars

Again I did not get an after shot...but to my defense, there wasn't any leftovers so I couldn't!! These were gone fast when I brought them to work!

Cookie Bars (Pinterest):

1/2 c butter
1 c brown sugar
1 egg
1 tsp vanilla
1 c flour, sifted
1/2 tsp baking powder
1/2 tsp salt
1/8 tsp baking soda
3/4 c chocolate chips

Melt butter in microwave safe bowl until melted. Let cool. Add brown sugar, vanilla & egg-mix well. Add dry ingredients gradually. Blend well and pour into greased 9x9" pan. Sprinkle with chocolate chips and bake at 350 for 20-25 min.


Enjoy!...

Chocolate Chip Caramel Butter Bars

I needed to make a dessert for a potluck for work & I found this recipe on Pinterest. I don't have the after shot but they were really good! And they did not last long with the therapists!

Chocolate Chip Caramel Butter Bars (Pinterest) (24 bars):

1 1/2 c unsalted butter
1 1/2 c sugar
2 large eggs
2 tbsp vanilla extract
1 tsp baking soda
1 tsp cream of tartar
1 tsp salt
4 c + 1/4 c flour, divided
2 c chocolate chips
1 (11-12 oz) jar caramel or salted caramel ice cream topping

Preheat oven to 350. Line a 9x13" pan with foil & spray with nonstick cooking spray. Cream butter & sugar with a mixer. Once mixture is creamed & fluffy, mix in the eggs & vanilla extract until smooth, then mix in the baking soda, cream of tartar & salt. Slowly mix in 4 c flour until mixture is just combined, then stir in the chocolate chips.

Press about 2/3 c of this mixture in the bottom and about 1/2" up the sides of the prepared pan. Stir in the caramel sauce & remaining 1/4 c flour in small bowl. Pour over the top of the dough. Drop spoonfuls of the remaining dough evenly over the top of the caramel.

Bake 25-33 min, or until the top looks done & is golden brown around the edges. It will still be somewhat jiggly in the center. Cool completely before cutting. It's easier to cut when chilled. Store in airtight container for up to 3 days or freeze up to 1 month.


Enjoy!...

Friday, May 19, 2017

Salted Caramel Butter Bars

We needed to make some desserts for a work meeting so I scoured Pinterest for some kind of bars to make up and I ran across these. They sounded good and simple to make. They were definitely good & really really rich! Almost too rich! If I make these again, I think I'd add more coarse salt on the top to take out some of the richness of it.

Find the recipe here


Ready to be baked again...


Enjoy!..

Monday, May 15, 2017

Peanut Butter Stuffed Brownies

Again I didn't take any after pictures, which I should have because these brownies turned out GOOD! We had to make sugary goodies for work for one of my coworkers for her bday so I took to Pinterest & this recipe made me drool so of course I had to make it. I didn't realize how rich they were going to be until I actually started making them. Once I brought them, I made one of my coworkers cut them into fudge-size pieces. They were really good! In fact I still have some of the leftovers (I made them in April!-I shoved them in the freezer). I'd definitely make them again-they were really easy.

Find the recipe here


Ready for the chocolate chips to be melted...

Tuesday, April 1, 2014

Milky Way Salted Caramel Chocolate Chip Cookies

This was the 2nd cookie I decided to make, along with the funfetti cookies, to take over to my friends' house. It sounded like a good combination of a cookie and it definitely was. The sea salt added a lot of good flavor to the cookie. The cookie itself was really rich but oh so good. One thing I learned was that once the sheet came out of the oven, the cookies had to rest on the cookie sheet for at least 5 minutes before being transferred to a cookie rack, otherwise the caramel would drop out of the cookie. Other than that, the prep work was a little more time consuming but the cookies were pretty easy to make. I'd make these again! I found these on Pinterest as well via www.instructables.com.

Milky Way Salted Caramel Chocolate Chip Cookies (30+ cookies):

Pkg of Milky Way Simply Caramel Fun Size candy bars
4 c flour
1 tsp baking soda
1 tsp sea salt
1 1/2 c unsalted butter, melted
2 c brown sugar
1 c granulated sugar
1 tbsp vanilla extract
2 eggs
2 egg yolks
3 c semi-sweet chocolate chips

Preheat oven to 325. Sift the flour with the salt and baking soda; set aside. In a mixer, cream together the melted butter, brown sugar and granulated sugar. Once incorporated, beat in the eggs, then the vanilla. After the wet ingredients are combined, add in your dry ingredients. Mix until just combined and then add the chocolate chips.

Cut the milky way candies in half and dip them into sea salt to seal the open caramel end. Take a ball of dough, just big enough to cover the half-mini-bar, add more dough if needed. Roll into a ball and sprinkle the top with more sea salt.

Bake for 17 minutes on a cookie sheet. Let cool 5 minutes before transferring to a cooling rack. Enjoy!


The wet ingredients...


Chocolate chips mixed into the dough...


Sea salt...


Salting the cut end of the milky way...


About to wrap up the milky way into the dough...


Sprinkled with salt and ready to be baked...


Cooling on a cookie rack...


Enjoy!...

M&M Funfetti Cake Mix Cookies

I love baking but I don't usually like to eat what I bake so it all goes to waste. So I made a deal with some friends of mine..I would bake and they could get the majority of what I bake as long as they keep providing me with my friend Jeremiah's beef stew, which I'm in love with. They are both sugar fans and they have kids living with them so I knew the cookies wouldn't be wasted. My friend loves funfetti and I've always wanted to try turning a cake mix into a cookie. I found this recipe on Pinterest via www.thefrugalgirls.com.

The cookie was super easy to make. I'm not too sure I liked it because it's a softer cookie. I like soft cookies...if they are full of chocolate or caramel or peanut butter. I brought these cookies, along with the milk way cookies over to my friends' house and they loved them so I guess that's what matters!

M&M Funfetti Cake Mix Cookies (About 2 dozen cookies):

1 (15.24 oz) Pillsbury Funfetti Cake Mix
1 1/2 c M&Ms
2 eggs
1/2 c veggie or canola oil

Combine the cake mix, eggs and oil in large mixing bowl and beat well. Stir in the m&ms. Drop onto ungreased cookie sheets in rounded balls. Bake for about 8-9 minutes, or until done at 350. Cool on a wire rack. Enjoy!


M&Ms mixed into the batter...


Ready to be baked...


Cookies cooling on the rack...


Perfect cookie...


Enjoy!...

Tuesday, September 17, 2013

Mini Cheesecakes

So normally when I make these cheesecakes, I make a double batch. I only made one batch this time since there would only be 3 of us eating off of them all weekend. However since both my friends love cheesecakes, I probably could have gotten away with the 2 batches and they could have just taken the leftovers home and would have been happy. Oh well. I found this recipe several years ago on www.kraft.com Since I only made the one batch, I mixed things up a bit. One batch each normally makes 12 vanilla cakes and 12 chocolate chip cakes. With the vanilla, you would use 12 vanilla wafers at the bottom as the crusts. Since I knew I was only making the one batch, I just used Oreos instead. I don't eat either cookie so I thought it would be less wasteful if I just picked one. I separated the batches and added chocolate chips to one batch and left the other plain. I didn't measure exactly half so I had a little more chocolate chip cakes than vanilla but it worked out and I didn't have any complaints! This is a perfect serving size if you are craving cheesecakes and I've made these desserts several times in the past couple of years. You can either chose to eat the vanilla cakes plain or add some fruit to them-either way they are really good!

Mini Cheesecakes (12 servings)

2 (8 oz) pkg cream cheese, softened
1/2 c sugar
1/2 tsp vanilla extract
2 eggs
12 vanilla wafers (or 12 Oreo cookie halves)
Assorted fruit
1/4 c chocolate chips

Preheat oven to 350. Beat cream cheese, sugar and vanilla in a large bowl with mixer on medium until well blended. At this point, I separated the batches and added chocolate chips to one batch. Place one cookie in the bottom of 12 med paper-lined muffin cups. Fill evenly with batter.

Bake 20 min or until centers are almost set. Cool. Refrigerate 3 hours or overnight. Right before serving, top with assorted fruit of your choice.


Oreos as a base...


Batter separated...


Ready to be baked...


Enjoy!...

Monday, August 5, 2013

Yogurt Cake with Tart Cherries

I found this recipe on Pinterest via www.http://cafechocolada.blogspot.com/ My friend has a pretty decent size tart cherry tree in her backyard so we picked them all but couldn't figure out what to do with them. I found this recipe and it looked pretty good. And easy. The only ingredient I was unsure of was the vanilla sugar. I didn't have a vanilla bean but I found something online that said I could make my own vanilla sugar using 1 tsp vanilla extract per 2 cups of regular sugar so I used 1/2 tsp vanilla extract and 1 c sugar. I let it dry out on a cookie sheet for about 20 minutes. Not sure what I'm going to do with the rest of the sugar now that it's made but I'll figure that out later.

The cake was okay..not very sweet tasting though. And the cherries were sour to begin with and they remained sour in the cake. Not sure I like the flavor of the cake. I thought the powdered sugar would help, but it didn't do too much. Pretty sure I won't be making this again. I took a couple pieces home with me and left the rest at my friend's. It might be good with a cup of coffee in the morning.

Yogurt Cake with Tart Cherries:

3 eggs
1 c plain yogurt
3 c flour
1 1/4 c sugar
1/2 c oil
2 tsp baking powder
2 tsp vanilla sugar
2 c tart cherries

Grease an 11x3-inch baking dish. Preheat oven to 395. Add baking powder to flour and mix well. Place cherries in their own bowl and add about 2 tbsp flour and shake to coat them.

With a hand mixer, mix eggs, sugar and vanilla sugar. Then add yogurt and oil and mix well. Gradually add flour mixture with baking powder and mix well. Fold in the cherries, being careful not to crush them. Pour into the prepared baking dish. Bake about 30-40 minutes or until a toothpick comes out clean. Let the cake cool about 10 minutes and then dust with powdered sugar.


Vanilla Sugar...


Ingredients mixed together...


Ready for the oven...


Powdered sugar on top...


Enjoy!...

Saturday, June 1, 2013

Carmelitas

I had been madly craving something sweet but something that was baked and not cookies. So I started looking on Pinterest for ideas and came across this gem via luluthebaker.blogspot.com The picture looked fantastic and it seemed easy to make. And omg it was amazing! But it was so rich I could only eat a little bit at a time. I actually brought it up to my parent's with me so they could help me eat it before it went bad. It was definitely good but I don't think I'll make it again unless I'm going somewhere I can bring it so others besides me can eat it!

Carmelitas:

32 caramel squares, unwrapped
1/2 c heavy cream
3/4 c butter, melted
3/4 c brown sugar, packed
1 c flour
1 c rolled oats
1 tsp baking soda
6 oz semisweet chocolate chips

Combine caramels and cream in a small saucepan over low. Stir until completely smooth; set aside. In separate bowl, combine melted butter, brown sugar, flour, oats and baking soda. Pat half of oatmeal mixture into bottom of an 8x8 inch pan. Bake at 350 for 10 minutes. Remove pan from oven and sprinkle chocolate chips over crust. Pour caramel mixture over chocolate chips. Crumble remaining oatmeal mixture over caramel. Return to oven and bake an additional 15-20 min, until edges are lightly browned. Remove from oven and cool completely before serving.

*The bars take a while to cool since there's a lot of caramel in there. The bars taste good warmed up in the microwave.


Mixed together...


Crust before the oven...


Bottom crust from the oven...


Melted caramel on top of the chocolate chips...


Additional crumbs crumbled on top...


Enjoy!

Tuesday, April 16, 2013

Fruit Squares

I found this recipe in a Eating Well magazine and it seemed like a really good Spring dessert. With Easter coming up, I decided to try making these. The recipe had 3 different variations for these bars: Blueberry bars, Strawberry-Rhubarb bars & Raspberry bars. My plan was to make a double batch in the same pan, not realizing that the flavors would blend together to make a marble effect. It turned out okay in the end though. I had originally wanted to make raspberry and strawberry-rhubarb but it's not the season for rhubarb and Whole foods didn't have any fresh or frozen rhubarb so I went with blueberry instead.

I made this dessert the night before Easter at like 1 am because I had bowling leagues that night and I went out with some friends after. It was either make it when I got home and sleep in in the morning or wake up early to make it..I opted for the sleeping in part! I didn't realize what a process it was to make! But it was definitely worth it in the end! I had a lot of leftovers so I should have just made the one batch but it worked out okay. Some of my family said it was too tart while others seemed to like the tartness of it just fine.

I'm posting the single batch so if you decide to make a double batch like I did, just double the measurements!

Fruit Squares (9 squares) (Eating Well):

*Crust

1 c white whole-wheat flour
1/3 c powdered sugar
3 tbsp cornstarch
1/4 tsp salt
3 tbsp canola oil
2 tbsp butter

3 c blueberries or 2 c chopped strawberries with 2 c chopped rhubarb or 3 c raspberries
1/3 c water
2 tbsp lemon or lime juice
1/3 c sugar

3 tbsp cornstarch
1/8 tsp salt
2 large eggs

Garnishes: Sliced raspberries, blueberries, strawberries, powdered sugar

Preheat oven to 350. Line an 8-in square baking sheet with foil and coat it with cooking spray. Combine flour, powdered sugar, cornstarch and salt in med bowl. Add oil and butter; using your fingertips, blend into flour mixture until evenly combined. The mixture will be a little crumbly. Firmly press dough into prepared pan. Bake until just barely beginning to brown, 15-20 min.

While crust is cooking, combine fruit of your choice and water in med saucepan. Cook over high, stirring, until fruit is mostly broken down, 4-6 min. Pour through a fine-mesh sieve and press on solids to extract all the juice; discard solids. You need 1 c strained juice; remove any extract or add a little water if you are short. Stir in lemon or lime juice into strained fruit juice.

Whisk sugar, cornstarch and salt in med bowl until well combined. Whisk in eggs. Stir into the juice mixture. Pour filling over crust.

Bake until just set, 15-20 min. The center should still be a little jiggly-it will firm up as it cools. Let cool to room temp on a wire rack about 1 1/2 hours. Using foil, gently lift bars out of pan. Cut into 9 squares. Garnish with fresh fruit and dust with powdered sugar just before serving.


Blueberry & Raspberry filling...


The flavors blending...


Fresh from the oven...


All decorated...


Enjoy!...

Monday, March 11, 2013

Cookies in Muffin Cups

I found this idea on Pinterest tonight when I found the orzo recipe. The idea came from this blog: www.myfridgefood.blogspot.com It's a good idea, one that I should have thought of! I found some refrigerated cookie dough in my fridge so I used that. I decided to use paper cups as well. I always like to add M&Ms to my cookies so I did that and placed the dough in the cups. I cooked them per the package directions and they turned out pretty well. My only complaint is that the bottoms of the cookies are really greasy. Maybe they will dry out once I take them out of the cups and put them in containers for storage. I still have some leftover dough so maybe if I don't use the muffin cups next time they won't be so greasy.


Cookie dough in the muffin cups...


Fresh from the oven...


Enjoy!...

Tuesday, January 11, 2011

Chocolate Covered Peanut Butter Cheesecake Pops


The above picture is what this dessert was supposed to look like...mine didn't turn out so pretty! But they still tasted good! I found this recipe on www.foodnetwork.com while looking for a new dessert recipe for our annual girls' Thanksgiving/Holiday dinner. It looked and sounded good and it did taste good and I did get good reviews from the girls. But it was a little more difficult to make and I think the next time I make it, instead of putting it in the fridge overnight, I will freeze it so when I cut it, it won't fall apart on me and fall off the sticks. The cheesecake was so soft, I ended up taking out the sticks and drizzling chocolate over it. It worked. Oh and next time, I'll be more careful and not cut my finger open with the scissors while cutting the sticks in half!

Ingredients:

1 1/2 cups dark brown sugar
1 1/2 lb cream cheese, at room temp.
1/2 cup heavy cream
2 large egg yolks
1 tbsp pure vanilla extract
1 3/4 cup creamy peanut butter

Chocolate:

5 tbsp veggie shortening
12 oz semisweet or bittersweet chocolate chips (I used Ghiradelli chocolate chips)

Wooden pop sticks (I used cheap wooden skewers that I cut int half)

For the cheesecake: Position rack in the middle of the oven and preheat to 325 degrees. Line a 8-in by 8-in baking dish with foil letting long flaps overlap on each side. Spray foil with nonstick cooking spray.

Break up the brown sugar to remove all lumps. In a standing mixer with the paddle attachment, beat the cream cheese and sugar on medium speed until smooth. Add the cream and beat slowly; then add the yolks and vanilla mixing until just combined. Gently stir in peanut butter. Make sure not to over beat the mixture otherwise it can cause the cheesecake to crack.

Pour and evenly spread the batter in the prepared pan. Bake for 15 minutes. Open the oven to release some heat, then lower the temperature to 200 degrees. Continue to bake the cheesecake until the outside is set but the center is still loose, for about 45 minutes. Turn off the oven, and cool cheesecake in the oven for 45 more minutes. Cover and refrigerate at least 8 hours or overnight.

Lift cheesecake from the pan by lifting up the foil. Transfer to a cutting board. Cut into 1 1/2-inch cubes. Stick a wooden pop stick halfway into each bar and freeze for 1 hour.

Meanwhile, place shortening and chocolate chips in a microwave safe bowl and heat the chocolate at small intervals, mixing well in between.

Dip the cheesecakes into the chocolate mixture, and stand on waxed paper to set, about 5 minutes. At this point, I put them in the freezer to set more quickly. Serve cold (straight from the fridge), or freeze up to 2 weeks. (Left out, the cheesecake tends to melt a little.)


Adding the cream...


Mixing up the ingredients...
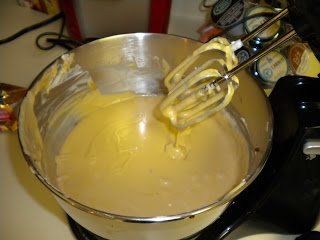


After the peanut butter was added...


Cutting up the cheesecake...


Cheesecake with the sticks in before dipped in chocolate...


Finished product, minus the sticks...Enjoy!

Thursday, January 6, 2011

Peanut Butter Blossoms

For as long as I can remember, my mom has always made these cookies for Christmas. Either to hand out to her daycare parents or just for us to snack on. Needless to say, these are my favorite so every year, we still continue to make them. And since she no longer does daycare, my mom sends home lots of cookies with me!

Ingredients:

3/4 cup sugar
3/4 cup brown sugar
1 1/2 sticks unsalted butter
3/4 cup peanut butter
2 eggs
1 3/4 cup flour
2 tsp baking soda
1/4 tsp salt
Hershey Kisses

Preheat oven to 350. Mix dry ingredients and set aside.

Mix sugars, butter and eggs, beating until fluffy. Gradually add dry ingredients with wet dough. The dough should be stiff (you may need to add more flour to make it stiff if the dough is not stiff enough to handle). Make into 1-in balls, roll in sugar and place on a greased pan.

Bake for 10 minutes or until cracks appear. Remove from oven. Press Hershey Kisses into center of each cookie. Return to oven and bake 3-5 minutes longer.


Unwrapping all the Hershey Kisses...


All rolled up and ready to be baked!


Right before they went back into the oven for the last time...


The recipe made lots and lots of cookies! Mine are in the freezer since I can't possibly eat them all before they go bad! Enjoy!